3D models supported by eCorpus
An eCorpus scene is initializaed by a 3D model under a glTF Binary format (shortened in .glb). This is a surface 3D model format optimized for WebGL and online use on an internet browser.
This format is free, it is defined by the Consotirum Khronos. Its documentation is freely accessible on the GitHub project page.
Summary
Materials
The models use a PBR (Physically Based Rendering) system allowing renderings to be as photorealistic as possible.
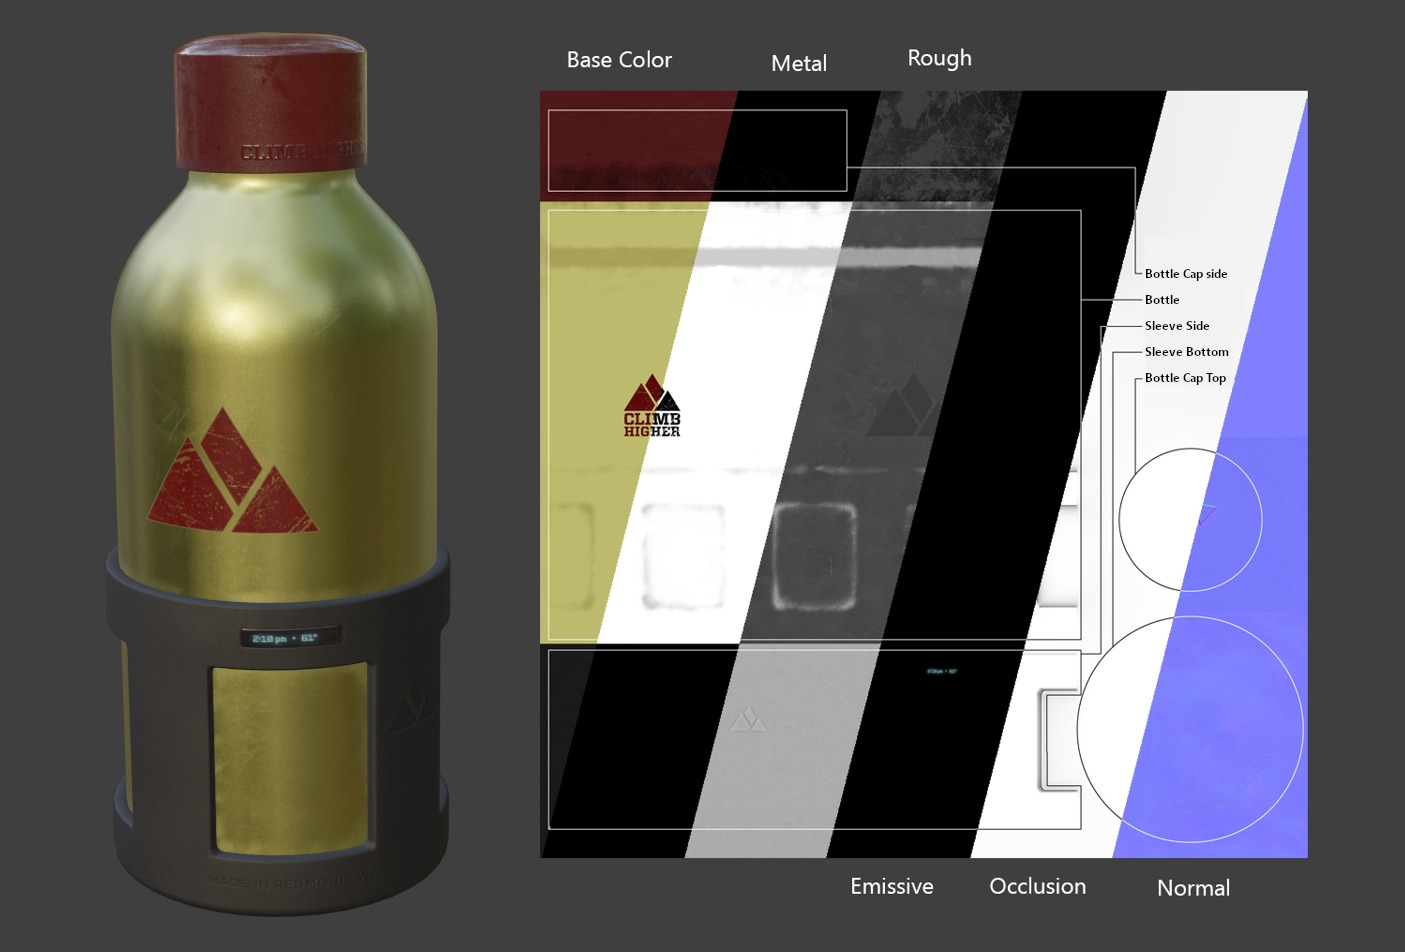
A model integrates the following layers of information:
| Name of the information | Editable with eCorpus | Description |
|---|---|---|
| Base Color | Yes | Raw colors of the model surface. The color base is essential in 3D scanning |
| Metallic | Yes | Set whether the material has metallic reflection properties or not. This information is necessary if the object does not contain any metallic trace. |
| Roughness (or glossiness) | Yes | Defines the level of glossiness of the model surface (glossyness is the opposite of roughness). |
| Ambient Occlusion | Yes | Artificially accentuates shadows in the nooks and crannies of the model. |
| Normal Map | No | Artificially adds micro surface details without affecting the geometry of the object. Adds detail without increasing the density of the object. |
| Emissive | No | Defines whether the object is backlit or not. |
Tip: The three textures of Metallic, Roughness and Ambient Occlusion share a single image using the R, G and B channels. Thus, using only one of them or all 3 at the same time has no influence on the size of the file and its performance.
Complete Documentation : Everything you need to know about GLTF export on Blender
How to Test a 3D model
3D Model : You can use the 3D models in GLTF demo using this link.
You can use this .glb format model.
Don’t have an eCorpus account? Carefree ! Stand Alone mode allows you to test your 3D models without having an account on an eCorpus database:
Click here to access the Standalone test scene
To do this, simply drag your GLB model into the scene above. The object will appear in the scene if the import was successful.
Attention ! This scene cannot be saved, any changes made will be lost.
- If you would like to know more about importing models into eCorpus, please refer to this guide.
SetUp your 3D model
Requierements : Blender
To edit, transform and export your 3D models, Blender is the most suitable software.
Free and free, you can download it for any platform on the official website: blender.org.
Import your model on Blender
In order to edit and export your 3D models on Blender, you first need to import them on said software. To do this, first open Blender.
Clean up the StartUp scene
Upon opening, the software creates a default scene containing a camera, a light, and a cube. These objects are superfluous, we advise you to delete them using this procedure:
-
Press the A key (to select all objects present in the scene);
-
Press the Delete key (to delete the selected objects).
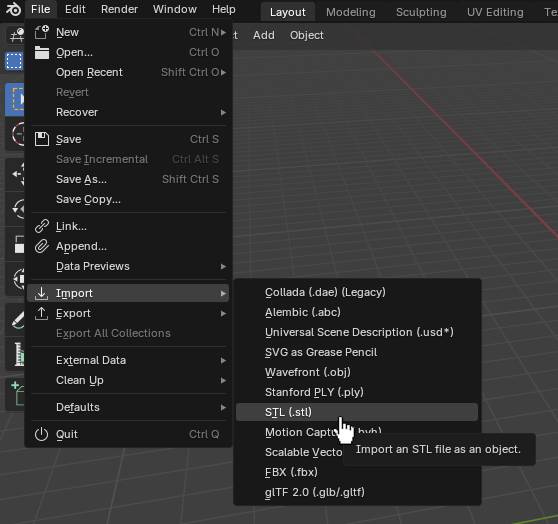
Import your model
To import a 3D model, please go to the tab bar at the very top of the application, left side, and click on:
- File> Import> Select the format corresponding to the model to import
Add an add-on
The procedure is the same, whatever the format to import. If your 3D model format is not listed, there may be an add-on available to allow you to add it to the list:
- Edit> Preferences> Add-ons
Type the name of the format to import into the search bar. Then simply check the box for the add-on to add.
Blender may not update immediately after adding an add-on. Feel free to close and reopen Blender for the changes to take effect.
From a CAD editing software to a STL
STL (stéréolithography)
A 3D file format primarily intended for 3D printing. It does not include color or texture information as it is not used in this context.
STLs are easily generated by CAD software such as SolidWorks, AutoCAD or FreeCAD.
- Upcoming tutorial: design a 3D model on Fusion360 and FreeCAD software
Detailed specifications of .STL format
| Information | Available on this format |
|---|---|
| Textures | No |
| Vertex Color | No |
| Animations | No |
| Metadata | No |
Good to Know
-
You can add basic material information via eCorpus object editing. A tutorial on this topic will be available soon.
-
An advanced tutorial on editing 3D models on Blender will also be available soon.
-
The .STL format is a proprietary format. It is therefore not recommended to use this format.
From a 3D scan in OBJ
Wavefront (OBJ)
A 3D file format most commonly used when sharing 3D modeling. Widely recognized by most 3D editing software, it is used for uses such as 3D printing, architectural rendering and virtual reality.
This simple format allows a lot of data information to be stored. It is often associated with an additional metadata file (.mtl). However, not all applications read OBJs the same way. Slight differences with the original file may therefore appear during import. Fortunately, these problems can be easily corrected.
Due to this compatibility constraint, it is recommended to keep the model textures in an additional folder to be able to re-import them on the model if necessary.
- Upcoming tutorial: scanning with your smartphone and photogrammetry apps
Detailed specifications of .OBJ format
| Information | Available on this format |
|---|---|
| Textures | Yes |
| Vertex Color | No |
| Animations | Yes |
| Metadata | Yes |
Good to Know
-
You can add basic material information via eCorpus object editing. A tutorial on this topic will be available soon.
-
An advanced tutorial on editing 3D models on Blender will also be available soon.
-
The .OBJ format is an OpenSource format.
From a PLY format
Standfort File Format (PLY)
Also going by Polygon, is a 3D file format used most frequently by 3D scanners as a point cloud, or 3D object. It stores a lot of information, such as the color and texture of an object.
It is frequently used for 3D printing and realistic representation of objects.
-
.PLY files contain color information of an object, however, this is not necessarily present in the form of a texture. If the color of your 3D object is displayed as Vertex Color, it will be necessary to perform a texture baking in order to be able to export them in .GLB format.
-
.PLY files may contain point clouds. However, only 3D meshes can be exported in .GLB format, and therefore imported into eCorpus.
Detailed specifications of .PLY format
| Information | Available on this format |
|---|---|
| Textures | Yes |
| Vertex Color | Yes |
| Animations | No |
| Metadonnées | Yes |
Good to Know
-
You can add basic material information via eCorpus object editing. A tutorial on this topic will be available soon.
-
An advanced tutorial on editing 3D models on Blender will also be available soon.
-
An advanced tutorial on converting point clouds to 3D mesh should be released soon.
-
The .PLY format is an OpenSource format.
From a FBX format
FilmBox (FBX)
A 3D file format most frequently used for video game and special effects graphic elements. It allows the storage of a large amount of data, such as the texture and the animable frame (rig) of an object.
It is most often used with AutoDesk applications, such as 3DS Max or Maya.
Like the .OBJ format, compatibility constraints may cause slight differences between the initial model and the imported model. It is therefore recommended to keep the model textures in an additional folder to be able to re-import them on the model if necessary.
Detailed specifications of .FBX format
| Information | Available on this format |
|---|---|
| Textures | Yes |
| Vertex Color | No |
| Animations | Yes |
| Metadonnées | Yes |
Good to Know
-
You can add basic material information via eCorpus object editing. A tutorial on this topic will be available soon.
-
An advanced tutorial on editing 3D models on Blender will also be available soon.
-
The .FBX format is a proprietary format. It is therefore not recommended to use this format.
From a DAE format
Collada (DAE)
A file format both 2D and 3D. It can contain a wide range of texture and rig information, just like FBX.
By its so-called free to use nature, this file format is designed to be compatible with as many platforms as possible.
Detailed specifications of .DAE format
| Information | Available on this format |
|---|---|
| Textures | Yes |
| Vertex Color | Yes |
| Animations | Yes |
| Metadonnées | Yes |
Good to Know
-
You can add basic material information via eCorpus object editing. A tutorial on this topic will be available soon.
-
An advanced tutorial on editing 3D models on Blender will also be available soon.
-
The .DAE format is an OpenSource format.
From a USD* format
Universal Scene Description (USD*)
Also called OpenUSD, is a 3D file format used in architectural, special effects and CAD graphics renderings. The general USD format is commonly followed by a ‘*’ because there are a wide variety of different encodings of the format (.usd, .usda, .usdc, .usdz, etc…).
This format can contain a wide range of information and is commonly used for collaborative editing of 3D scenes.
Detailed specifications of .USD* format
| Information | Available on this format |
|---|---|
| Textures | Yes |
| Vertex Color | Yes |
| Animations | No |
| Metadonnées | Yes |
Good to Know
-
You can add basic material information via eCorpus object editing. A tutorial on this topic will be available soon.
-
An advanced tutorial on editing 3D models on Blender will also be available soon.
-
The .USD* format is an OpenSource format.
Export a 3D Model into a .GLB
The format glTF (nomenclature .glb) is a format for storing complex 3D assets in a single file with maximum portability. It is therefore the most suitable format for Web and Mobile viewing.
- The .GLB format is an OpenSource format.
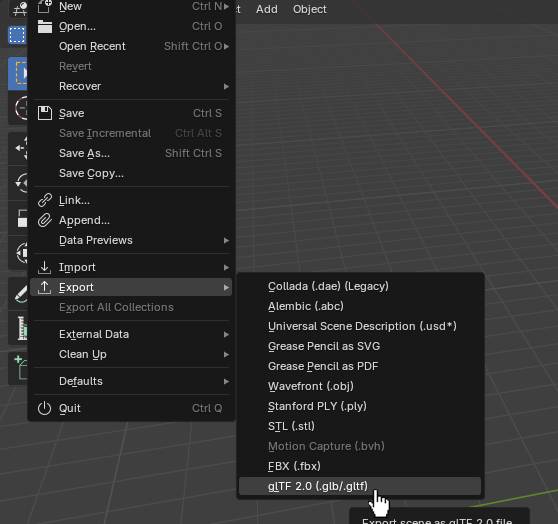
Export your 3D Model into GLB using Blender
Once your model is imported and edited on Blender, you can easily export it by following this procedure:
- Select the object(s) to export (Shift + Left click to add objects to your selection);
- Go to File> Export> glTF 2.0 (.glb/.glft).
If the GLB extension does not appear in the list
It is possible that the glTF extension does not appear in the list of formats available for export. If this is the case, simply activate the glTF 2.0 in the Preferences list.
Recommended export settings
Once the glTF export button is clicked, a pop-up will appear asking you in which folder and under what name your file will be saved. You will also find export settings to the right of this new window.
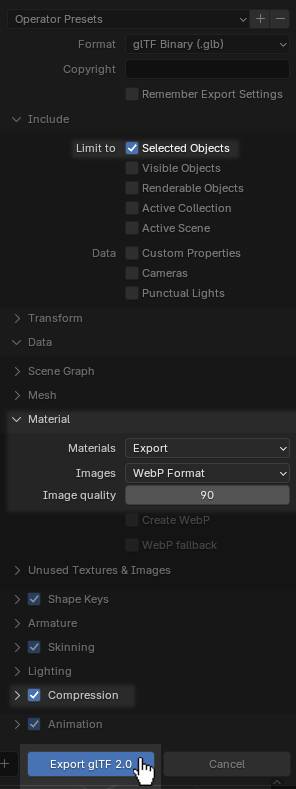
Here are the recommended settings for your GLB exports.
First of all, we advise you to check the Selected Object Only box to be sure to only export the selected object.
Then, in “Data” and “Material” select the “WebP” format in 90 compression for the textures.
Then, check the “Compression” box to lighten your model even further.
Learn More
If you want to learn more about eCorpus features, you can visit this guide: Import a 3D model to eCorpus.